
Posts
Netlify Functions RESTful API Without Express
What are Netlify Functions? Netlify Functions provide a simple way to build a serverless API layer for any front-end projects. These serverless functions are executed atop AWS’s Lambda platform. The rule here is …
In this article
What are Netlify Functions?
Netlify Functions provide a simple way to build a serverless API layer for any front-end projects.
These serverless functions are executed atop AWS’s Lambda platform. The rule here is keep it simple… keep it safe. No, wait, keep it simple, and keep it fast.
These functions have a default timeout of 10 seconds. Netlify does support background functions that can run around 15 minutes, but focus here is on the short-lived functions.
I’ll cover the basics on getting setup, then jump into how to use Netlify Functions as a RESTful API.
Setting up Netlify Functions
To start creating Netlify Functions the first thing you’ll want to do is install both the Netlify Lambda and Netlify CLI packages.
We’ll be using the Netlify Lambda to build our functions, and Netlify CLI for serving our local Netlify Functions.
>_ npm install -D netlify-cli
>_ npm install -D netlify-lambda
Note: You’ll want to install the Netlify Lambda locally to your project to support building functions used for continuous integration and deployment.
After the Netlify CLI is installed, either globally or locally as above, you’ll be able to test that Netlify CLI is installed by running the following command:
>_ netlify
Note: Make sure to run this command from the root folder containing your front-end project.
Running the netlify command should output all the available CLI options, but we’ll be focused on the functions commands specifically.
>_ netlify functions
Running the command netlify functions will output the function specific commands:
$ netlify functions
Manage netlify functions

USAGE
  $ netlify functions

DESCRIPTION
  The functions command will help you manage the functions in this site

ALIASES
  $ netlify function

EXAMPLES
  netlify functions:create --name function-xyz
  netlify functions:build --name function-abc --timeout 30s

COMMANDS
  functions:build   Build functions locally
  functions:create  Create a new function locally
  functions:invoke  Trigger a function while in netlify dev with simulated data, good for testing function calls including Netlify\'s Event Triggered Functions
  functions:list    List functions that exist locally
  functions:serve   (Beta) Serve functions locally
It’s true that Netlify CLI can build functions, but the results are zipped files for each function.
To enable custom Netlify Functions routes we’ll be using Netlify Lambda instead to build our functions. The result will be minified and compressed script file per function.
Now with the tools installed let’s take a look at setting up the Netlify Functions configurations.
Configuring Netlify Functions
This section assumes you’ve already created a front-end project and are adding Netlify Functions to the project.
I don’t normally jump into configuration over code first, but this is important.
Functions Build Folder
In order to test and deploy Netlify Functions each function must be built and placed into a designated build folder.
We’ll need to define what this folder is by adding a new build configuration setting to the netlify.toml file.
Open the netlify.toml configuration file at the root of the project, and add the following code snippet:
[build]
functions = "functions"
Here we’ve specified the [build] settings then set the functions path to <PROJECT_DIRECTORY>/functions.
Note: You’ll want to add the specified build folder to your
.gitignorefile.
Functions Dev Server Port
Using the Netlify CLI we can start a local Netlify Functions server for integration testing.
The default Netlify Functions server starts at port 9999.
It’s not covered in the Netlify Dev configuration documentation for some reason, but it’s an easy thing to change.
Open the netlify.toml configuration file at the root of the project, and add the following code snippet:
[dev]
functionsPort = "8885"
I’ve set the functions server to use port 8885, but you can freely change it to whatever port best suites your needs.
Functions Default Route
When the functions are served they’re accessible via <YOUR_DOMAIN>/.netlify/functions/.
By default this path creates a vendor lock-in, and limits our ability to scale and evolve the backend. Not knocking on Netlify, but it’s best they stay in the background of our front-end.
Note: Never expose any more about your infrastructure than is absolutely needed.
Let’s instead configure the functions to be accessible via <YOUR_DOMAIN>/api/.
To do this we’ll need to add a new redirect rule to forward any calls to our /api/* endpoint to the Netlify functions.
Open the netlify.toml configuration file at the root of the project, and add the following code snippet:
[[redirects]]
from = "/api/*"
to = "/.netlify/functions/:splat"
status = 200
force = true
This would force redirect paths like /api/todos to /.netlify/functions/todos. The splat is a wildcard that matches anything past that point.
Note: This will change the value of the Netlify Function’s request object’s
pathvalue. See the later section on RESTful Routing in Netlify Functions for more details.
The external caller will now only need to call /api/<FUNCTION_NAME>, and behind the scenes the Netlify Functions work their magic.
Creating Netlify Functions
Before getting any further let’s see exactly what a Netlify Function looks like:
/**
 * I only have 10 seconds to live...
*/
const handler = async (request, context) => {
  return {
    statusCode: 204,
    body: ""
  }
}

module.exports = { handler };
Each Netlify Function is simply a handler function that takes a request, with some context, and returns an HTTP status code with a stringified body value.
Let’s start by creating a new api folder in our src folder.
>_ cd src
>_ mkdir api
Within the api folder create a new javascript file named todos.js.
What we’re going to do is name each Netlify Functions script file after our resources.
Your project structure should now look similar to this:
📦 this-could-be-us
 ┣ 📂 src
 ┃ ┗ 📂 api
 ┃ ┃ ┗ 📜 todos.js
 ┣ 📜 .gitignore
 ┣ 📜 index.js
 ┣ 📜 netlify.toml
 ┗ 📜 package.json
The end goal will be to define the following routes for our todos resource:
GET     /api/todos      /* return list of to-dos */
POST    /api/todos      /* create new to-do */
DELETE  /api/todos/:id  /* delete a to-do */
Let’s open up the todos.js and see how we can take a simple handler function and build out some routes.
Within the todos.js file paste the following:
const handler = async (request, context) => {
  return {
    statusCode: 200,
    body: JSON.stringify(request),
  };
};

module.exports = { handler };
What we’ve done is define a new function handler that will immediately return the request it received.
The goal here is to inspect what our request input will look like. Now that we have a function defined we’ll need to build it.
To build the Netlify function we’ll need to use Netlify Lambda.
The command to build the functions is pretty simple. Netlify Lambda let’s us pass a source path where our functions are stored. Internally it’ll use the configurations defined in the netlify.toml file for our functions build folder to know where the built scripts will be created.
Assuming we’re at the root folder of our project you’ll simply need to open a command line interface and run the command:
>_ netlify-lambda build src/api
If everything worked as expected you should see output similar to the following:
$ netlify-lambda build src/api
netlify-lambda: Building functions
Hash: c65088b9daf4f8820b67
Version: webpack 4.46.0
Time: 934ms
Built at: 11/11/2021 10:43:29 AM
   Asset      Size  Chunks             Chunk Names
todos.js  1.09 KiB       0  [emitted]  todos
Entrypoint todos = todos.js
[0] ./todos.js 265 bytes {0} [built]
If you don’t see similar output just check that you’ve run npm install and that you’re at the root of your project folder.
At this point, assuming a successful build, we’ll be able to now use Netlify CLI to serve our new Netlify function.
To test the function you’ll need to run the command:
>_ netlify functions:serve
The command should result in the Netlify CLI starting up a server listing by default at port 9999.
$ netlify functions:serve
◈ Ignored general context env var: LANG (defined in process)
◈ Loaded function todos.
◈ Functions server is listening on 9999
Using your favorite REST test tool you’ll be able to make a GET request to localhost:9999/.netlify/functions/todos.
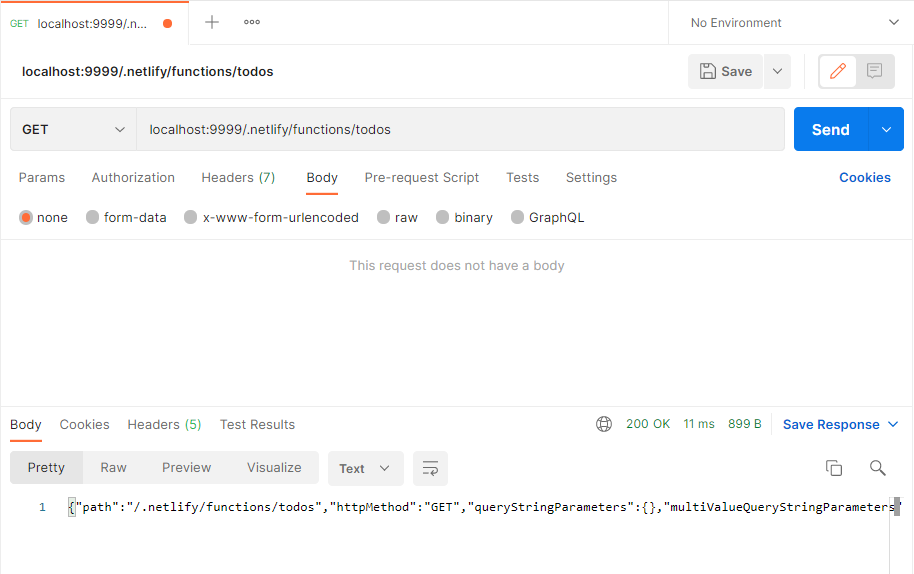
With PostMAN I’ve made the request and it returned a HTTP 200 result with a JSON body of the received request.

Now that we’ve created a function, built it, and are able to run the functions we’ll want to turn our focus to building out the todos function to handle RESTful requests.
Before we do let’s make one more change to our project.
NPM Test Script
Each time a change is made to the function we’ll want to be able to stop the functions server, build the updated functions, and then start the server back up.
Doing that through command line each time can become very cumbersome. Let’s improve the process by adding a single NPM test script that does all that.
From the root of your project we’ll want to open the project.json file.
Locate the scripts section of the project.json add the following script entry:
"serve:api": "netlify-lambda build src/api && netlify functions:serve"
This will allow us to quickly build and serve our Netlify functions with a single command:
>_ npm run serve:api
If all goes well we should see each command executed and a new server running with our updated functions.
$ npm run serve:api

> netlify-lambda build src/api && netlify functions:serve

netlify-lambda: Building functions
Hash: c65088b9daf4f8820b67
Version: webpack 4.46.0
Time: 708ms
Built at: 11/11/2021 12:20:40 PM
   Asset      Size  Chunks             Chunk Names
todos.js  1.09 KiB       0  [emitted]  todos
Entrypoint todos = todos.js
[0] ./todos.js 265 bytes {0} [built]
◈ Ignored general context env var: LANG (defined in process)
Command 'netlify-lambda build' was detected in script 'serve:api', but contained 2 or more function folders
◈ Loaded function todos.
◈ Functions server is listening on 9999
Now let’s look at how to add RESTful routing to our Netlify Functions.
RESTful Routing in Netlify Functions
Many web frameworks, like Express, use a router internally to match a URL path to a handler function. In the case of Netlify Functions the opposite is true.
Any and all requests to the function’s path, including query or additional path parameters appended to the script’s name, will be handled by the scripts single handler function.
Netlify Functions are hosted by default in the following way:
<YOUR_DOMAIN>/.netlify/functions/<FUNCTION_NAME>
With the todos.js function we could receive a number of requests like:
GET /.netlify/functions/todos?offset=0&limit=100
DELETE /.netlify/functions/todos/12345
Each of these requests, even with different paths parameters and HTTP verbs, will be handled by the todos.js function handler.
Every request object has the same schema. For example a simple GET request should look like the following:
{
  "path": "/.netlify/functions/todos",
  "httpMethod": "GET",
  "queryStringParameters": {},
  "multiValueQueryStringParameters": {},
  "headers": {
    "accept": "*/*",
    "cache-control": "no-cache",
    "host": "localhost:9999",
    "accept-encoding": "gzip, deflate, br",
    "connection": "keep-alive",
    "client-ip": "::1"
  },
  "multiValueHeaders": {
    "accept": ["*/*"],
    "cache-control": ["no-cache"],
    "host": ["localhost:9999"],
    "accept-encoding": ["gzip, deflate, br"],
    "connection": ["keep-alive"],
    "client-ip": ["::1"]
  },
  "isBase64Encoded": false,
  "rawUrl": "http://localhost:9999/.netlify/functions/todos",
  "rawQuery": ""
}
Note: Any request that has a request body will append a
bodyproperty to the received request.
There are a few properties we’ll need to focus on to build routing for our todos function.
| Property | Description |
|---|---|
| path | The relative path of the invoked function. |
| httpMethod | HTTP method used in the request. |
| headers | Object containing all the request header values. |
| body | Stringified data value sent with the request. |
The path and httpMethod are the primary properties we need to build our RESTful endpoints.
The headers could be used for passing auth tokens to downstream services. For now I won’t really dig into the headers for this walkthrough.
In any POST or PUT operation the request body will be stringified and added to the request object as a body property. By default the body is undefined.
What we need to do now is create our own router within the todos function handler to support using Netlify Functions in a RESTful way.
Big lesson here. Don’t reinvent the wheel.
Using Crossroads.js Routing Library
While it’s not the most actively supported routing library, the Crossroads.js library is perfect for what we need.
Crossroads.js allows us to define a route, and a route handler to be invoked if the path is matched. This is the same thing many other popular web frameworks do, but without all the overhead.
We’ll first need to install Crossroads.js to start adding our routing:
>_ npm install crossroads
Now we’ll need to update our todos.js file to start adding our routes. Our end goal will be to handle at least one of the following routes:
GET     /api/todos      /* return list of to-dos */
POST    /api/todos      /* create new to-do */
DELETE  /api/todos/:id  /* delete a to-do */
Within the todos.js we’ll need to add the crossroads routing library to the top of the file.
const crossroads = require("crossroads");
By destructuring the request object we can take the path, HTTP method, and the body of the request.
const handler = async (request, _context) => {
  /**
  * Destructure the request object
  *
  * @param {String} path the relative path to the invoked function
  * @param {String} httpMethod the HTTP verb used in the request
  * @param {String} body the data submitted in the request
  */
  const { path, httpMethod, body } = request;
Borrowing the basic usage example from Crossroads.js Examples. It’s easy to see that we can add a route with templated parameters using addRoute().
crossroads.addRoute('/news/{id}', function(id){
  /* Route Handler Code Here */
});
crossroads.parse('/news/123');
Note: Crossroads.js routes can also be added with optional parameters, regular expressions, and route segments.
When the parse() function is invoked, the path will be matched against all defined routes. If there is a match the path parameters will be passed as arguments to the route handler function.
Crossroads.js does not support async functionality in handler functions so we’ll need to add a workaround.
We’ll need to wrap crossroads with a Promise to ensure we support async calls within our route handlers.
Here we’ll create a new Promise, set crossroads to match routes as case-insensitive, and we’ll add GET/.netlify/functions/todos as our first route to return all to-dos:
const response = new Promise((resolve) => {
  // Set crossroads to be case in-sensitive.
  crossroads.ignoreCase = true;
  // Add route to return all the to-dos.
  crossroads.addRoute(`GET/.netlify/functions/todos`, () => {
    // Resolve will handle a value or a promise from an external data store.
    return resolve([{
      id: '12345',
      task: 'Add a route.',
      complete: false
    }]);
  });
});
The route format I chose is to prefix the route with the expected HTTP method followed by the relative route path.
Makes it very simple to add routes within our Netlify function.
Later we can create a string literal of our request properties ${httpMethod}${path} and call the Crossroads.js parse() function.
With the HTTP method and path available we can add a try / catch block to handle any thrown exceptions from our route handlers.
The function should look like the following:
try {
  /**
  * Attempts to match the provided path with the
  * defined crossroad routes. Passing in the HTTP
  * method and path provided to the Netlify function.
  */
  crossroads.parse(`${httpMethod}${path}`);

  // Wait for the crossroads route handler to finish.
  const data = await response;

  return {
    statusCode: 200,
    body: JSON.stringify(data),
  };
} catch (_error) {
  return {
    statusCode: 500,
    body: "Internal Server Error",
  };
}
When the parse() function is called the Crossroads.js library will perform a path match evaluation. If the path is matched the route handler function for the path will be called.
This is done within our Promise where we can await the results.
Once we have the results we can return the stringified results back to the caller.
At this point we have all the tools needed to build out a more robust RESTful API.
Next Steps
To help get you started building fully flushed out RESTful Netlify Functions API.
I’ve created a project that integrates Netlify Functions with a RESTful to-do API backed with a Supabase database. You can find the code below: